MQTT-WEB Bridge
Two-way bridge between WEB and MQTT worlds
In this article, we will assemble a remote-controlled lamp and make it turn on and off according to a schedule, as well as according to other events that we have defined.
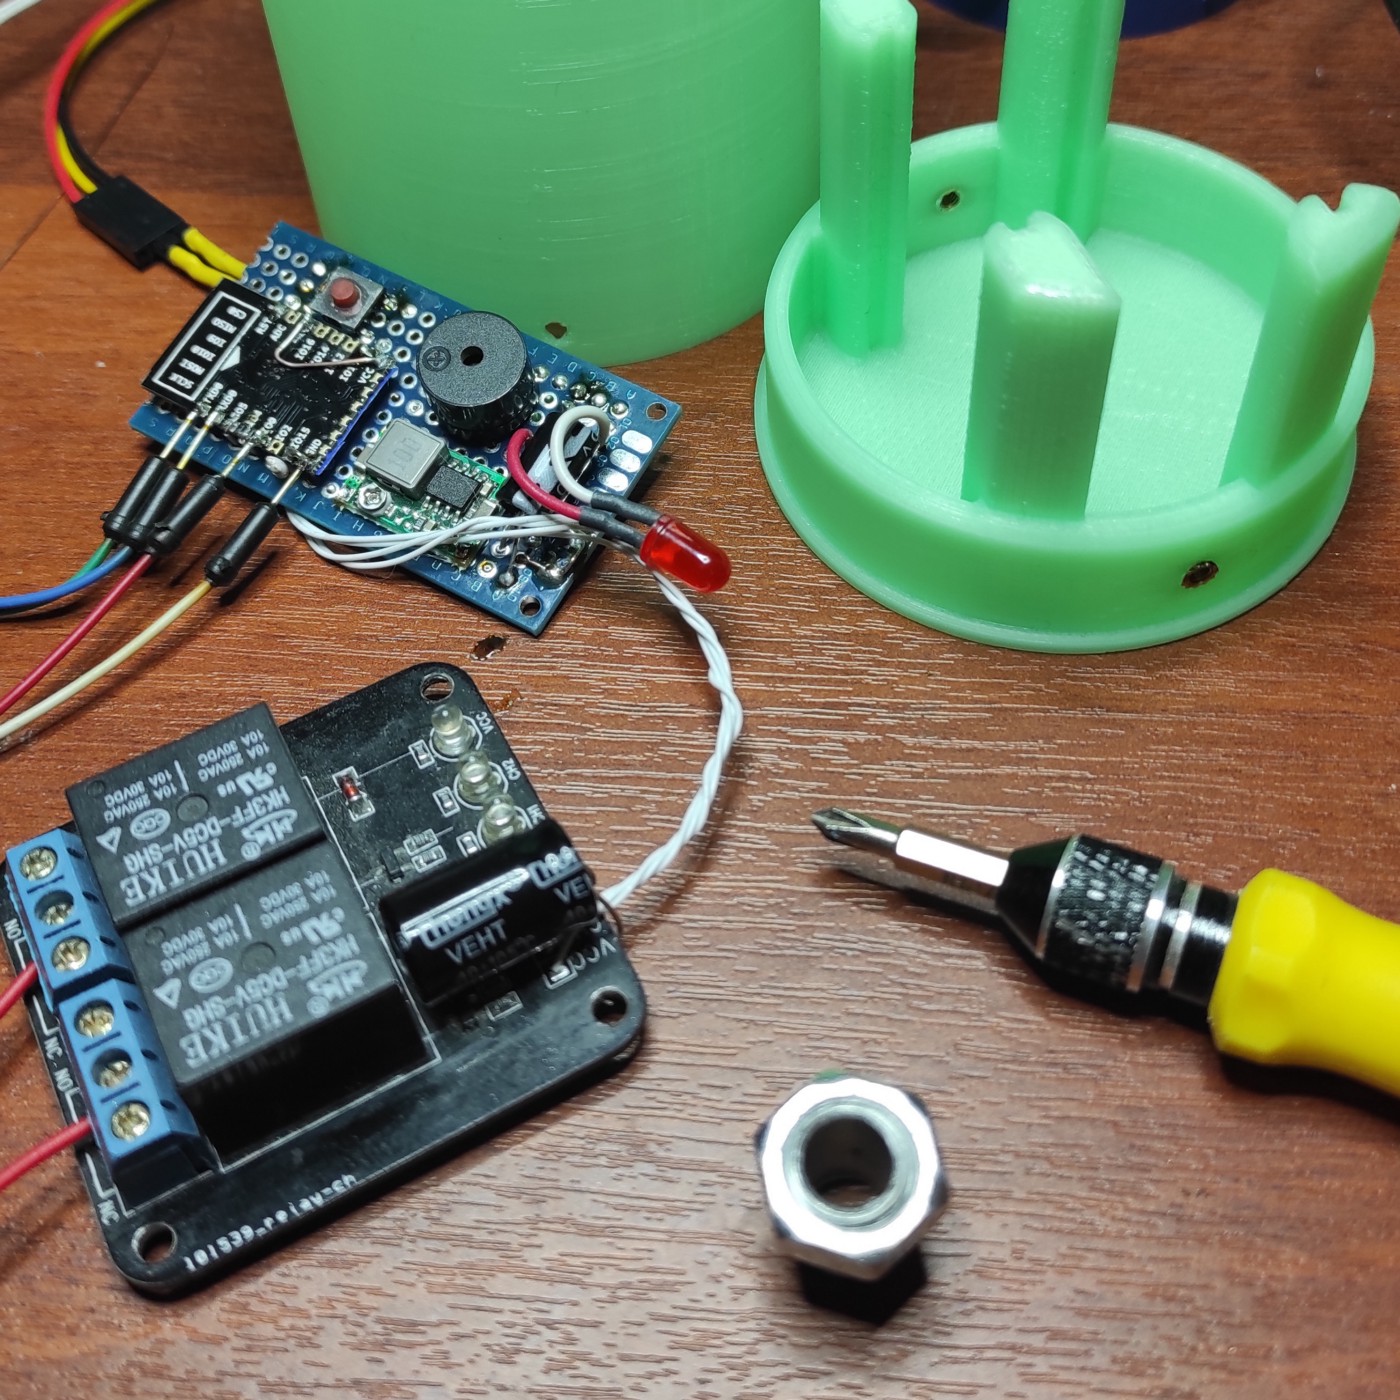
Inside the lamp body, the ESP-12 module with the necessary external components, and a pair of electromagnetic relays. The script in the module is subscribed to the topics corresponding to these relays.
Another bridge script is running on the server, connecting WEB requests to some MQTT topics (hereinafter referred to as the bridge).
To automate events, the IFTTT service is used, which interacts with the lamp through the bridge.
Materials
- ESP-12F module
- Double sided breadboard 70x30
- Resistor 4.7k
- Linear stabilizer LM1117–3.3
- Capacitors 10uF and 0.1uF, two each
- Mounting wire
- Two-channel relay module with operating voltage 5V
- Power supply 5V/1A
Relays must be designed for voltage 250V and current 10A.
I used the insides of an old phone charger as power supply.
Between the power supply and our device, it is desirable to include a 1.5A fuse
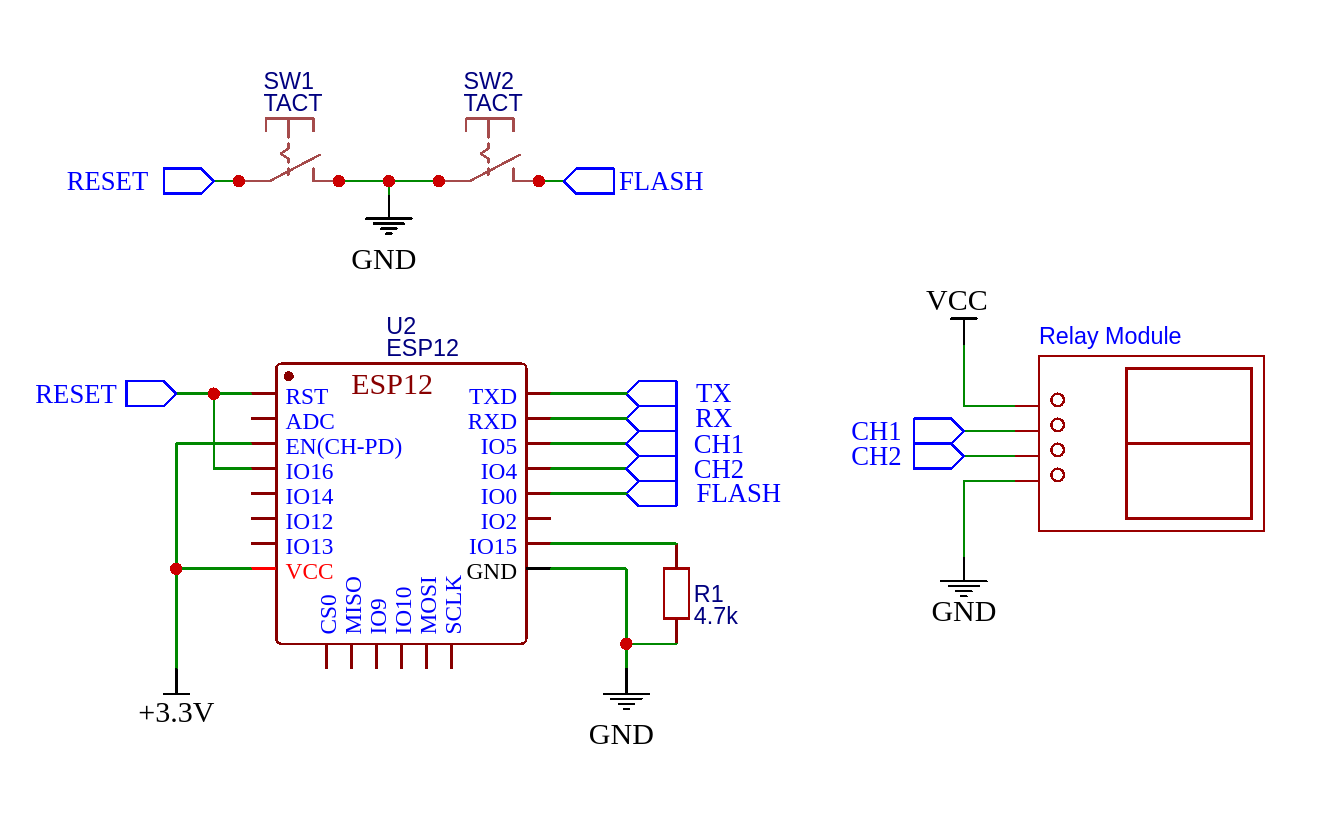
Schematics
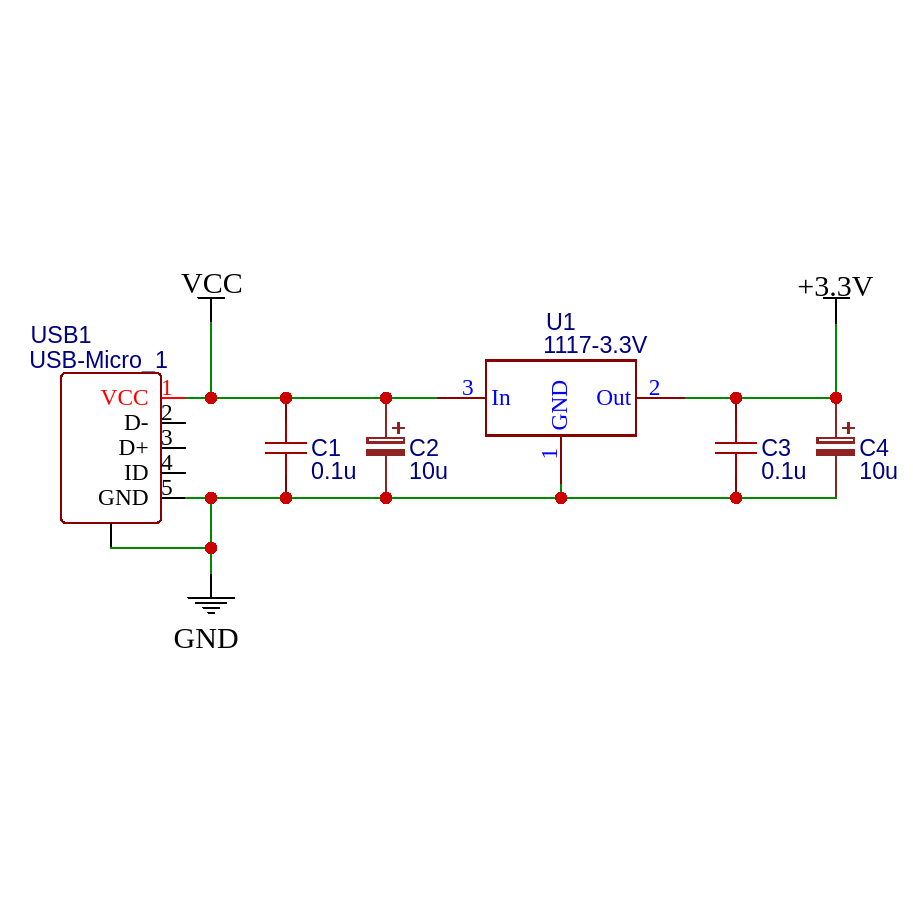
A 5V power adapter is connected to pins P1 and P2.
I used a miniature DC-DC buck module instead of the LM1117-3.3 linear regulator for slightly better power consumption.
As it turned out, when switching, the relays create a rather powerful interference, which in one case out of ten resets the controller. Not terrible, but sometimes you have to wait an extra 10 seconds until the light still lights up. The circuit with triacs would be spared from this shortcoming.
The diagram does not show chandelier lamps. They are connected to the “hot” half of the relay module to normally open (NO) contacts.
Code
# main.py

from umqtt.simple import MQTTClient
import machine
import utime
import ntptime
import ubinascii
import sys

ESSID = "myWiFiSSID"
PWD = "myWiFiPassword"

MQTTSRV = "192.168.1.1"
MQTTPORT = 1883
MQTTUSER = "myuser"
MQTTPWD = "MyPa55w0rD"

command_topics = ("lamp0", "lamp1")

INTERVAL = 1

lamp0 = machine.Pin(4, machine.Pin.OUT, value=0)
lamp1 = machine.Pin(5, machine.Pin.OUT, value=0)


last = 0
err = 0
resync = 0
client = None

def cb_msg(topic, msg):
    #print("RCV: {} - {}".format(topic, msg))
    channel = topic.decode().split("/")[-1]
    if channel == "lamp0":
        lamp0.on() if msg == b'1' else lamp0.off()
    elif channel == "lamp1":
        lamp1.on() if msg == b'1' else lamp1.off()


def initmclient():
    mclient_id = ubinascii.hexlify("AutoLamp")
    mclient = MQTTClient(mclient_id, MQTTSRV, MQTTPORT, MQTTUSER, MQTTPWD)
    mclient.set_callback(cb_msg)
    mclient.connect()
    for topic in command_topics:
        mclient.subscribe(topic)
    return mclient

def initwlan():
    network.phy_mode(2) #802.11g
    sta_if = network.WLAN(network.STA_IF)
    if not sta_if.isconnected():
        sta_if.active(True)
        sta_if.connect(ESSID, PWD)
        while not sta_if.isconnected():
            pass
    #print("WLAN CFG:", sta_if.ifconfig())
    return sta_if


initwlan()

rtc = machine.RTC()
def synctime():
    try:
        ntptime.settime()
        #print("NTP SYNC OK")
    except:
        #print('NTP ERROR')
        utime.sleep(10)
        machine.reset()
        sys.exit(0)

synctime()

def initmqtt():
    global client
    if client:
        try:
            client.disconnect()
        except:
            #print("MQTT DISCONNECT ERROR")
            pass
    try:
        client = initmclient()
        #print('MQTT INIT OK')
    except:
        #print('MQTT INIT ERROR')
        utime.sleep(10)
        machine.reset()
        sys.exit(0)

initmqtt()

while True:
    utime.sleep(INTERVAL)
    resync += 1
    if resync > 300:
        synctime()
        initmqtt()
        resync = 0
    try:
        client.check_msg()
    except:
        err += 1
        #print('MQTT CHECK ERROR')
        if err > 10:
            #print('MQTT CHECK FATAL')
            utime.sleep(10)
            machine.reset()
            sys.exit(0)
The firmware process is similar to that described at the end of the article about the ticker monitor.
Web bridge
#!/usr/bin/python3

import sys
import time
import base64
from urllib.parse import urlparse, parse_qs
from threading import Thread
import paho.mqtt.client as mqtt
from http.server import BaseHTTPRequestHandler, HTTPServer


MQTTSRV = '192.168.1.1' #'localhost'
MQTTPORT = 1883
MQTTUSER = 'myuser'
MQTTPASS = 'myPa55w0rD'
WEBADDR = '0.0.0.0'
WEBPORT = 8000
TOKEN = 'mySuperSecretToken'

subscribe_topics = (
                        'temp0',
                        'lamp0',
                        'lamp1'
                    )

publish_topics =    (
                        'lamp0',
                        'lamp1'
                    )

DB = {}


def on_conn(client, userdata, flags, rc):
    for topic in subscribe_topics:
        mqtt_client.subscribe(topic)

def on_msg(client, userdata, msg):
    DB[msg.topic] = msg.payload.decode('UTF-8')

def publish(topic, payload):
    DB[topic] = payload
    mqtt_client.publish(topic, payload, qos=0, retain=False)


class webBridgeHandler(BaseHTTPRequestHandler):

    def do_response(self, status = 200, content = 'OK'):
        self.send_response(status)
        self.send_header('Content-type', 'text/plain')
        self.end_headers()
        self.wfile.write(bytes(content, 'UTF-8'))

    def do_GET(self):
        parse = urlparse(self.path)
        query = parse_qs(parse.query)
        query_token = self.headers.get('Auth-Token', None)

        if query_token != TOKEN:
            self.do_response(status=512, content='TOKEN ERROR')
            return

        if parse.path.startswith('/sub'):
            topic = parse.path.split('/sub/')[-1]
            content = DB.get(topic, 'NONE')
            self.do_response(content = content)
            return

        elif parse.path.startswith('/pub'):
            topic = parse.path.split('/pub/')[-1]
            if topic not in publish_topics:
                self.do_response(status=513, content='TOPIC ERROR')
                return

            payload = query.get('payload', None)
            if not payload:
                self.do_response(status=514, content='PAYLOAD ERROR')
                return

            topic_content = payload[0]

            if topic_content == 'T':
                state = DB.get(topic, None)
                if state == '1':
                    topic_content = '0'
                else:
                    topic_content = '1'

            publish(topic, topic_content)
            self.do_response()
            return

        else:
            self.do_response(status=500, content='GENERAL FAILURE')
            return


mqtt_client = mqtt.Client()
mqtt_client.on_connect = on_conn
mqtt_client.on_message = on_msg
mqtt_client.username_pw_set(MQTTUSER, MQTTPASS)
mqtt_client.connect(MQTTSRV, MQTTPORT, 60)
mqtt_client.loop_start()

web_bridge = HTTPServer((WEBADDR, WEBPORT), webBridgeHandler)

try:
    web_bridge.serve_forever()
except KeyboardInterrupt:
    mqtt_client.loop_stop()
    web_bridge.server_close()
    sys.exit(0)
I could call this code different words, but let’s assume that it is self-documenting >__>
We can change or add items to the lists subscribe_topics, and publish_topics the first defines the topics that we can only view, and the second defines those to which publication is allowed.
Since only a faint hint of security is used here (the Basic HTTP Server documentation explicitly says - do not use in production), you should not add to the list of topics that allow publication, those that manage critical infrastructure - gas valves or centrifuges for uranium enrichment. Otherwise, someone who can eavesdrop on your traffic will easily sabotage your production of nuclear weapons. We will assume that the light bulbs in the chandelier are safe enough to use with this code.
Launch preparation
For all this to work, you need to configure and run the Mosquitto MQTT broker.
I wrote about how to do this in an earlier article.
In the code of the bridge and controller firmware, you need to set the user and password for connecting to the broker in the corresponding variables.
The MQTTSRV and MQTTPORT variables define the address and port on which the broker is running.
WEBADDR and WEBPORT set the address and port on which our bridge will listen.
It is advisable to come up with some kind of TOKEN authorization that will be transmitted in the Auth-Token HTTP header. For example like this:
$ head -n 1024 /dev/random | sha1sum
9ce1e1d92ddbcfe1cae0324f4da33bdc5dbc5be7
Using a token still does not make the service secure - the traffic remains unencrypted, and, hypothetically, can be overheard by attackers. This should be taken into account if you open access to the bridge from the Internet.
Launch
When everything is ready, launch the bridge:
$ python mqtt-web-bridge.py
You can check the work using curl, for example:
$ curl 127.0.0.1:8000/pub/lamp0?payload=1 -H "Auth-Token: 9ce1e1d92ddbcfe1cae0324f4da33bdc5dbc5be7"
And as soon as the request is processed, an entry will appear in the console:
127.0.0.1 — — [09/Aug/2021 08:01:54] “GET /pub/lamp0?payload=1 HTTP/1.1” 200 -
If the lamp is already connected, then one of the lamps should turn on.
Automation
Automation can be implemented in this system in different ways. For example, to enable/disable on a schedule, use cron or Systemd Timers. In this case, the bridge is not even needed.
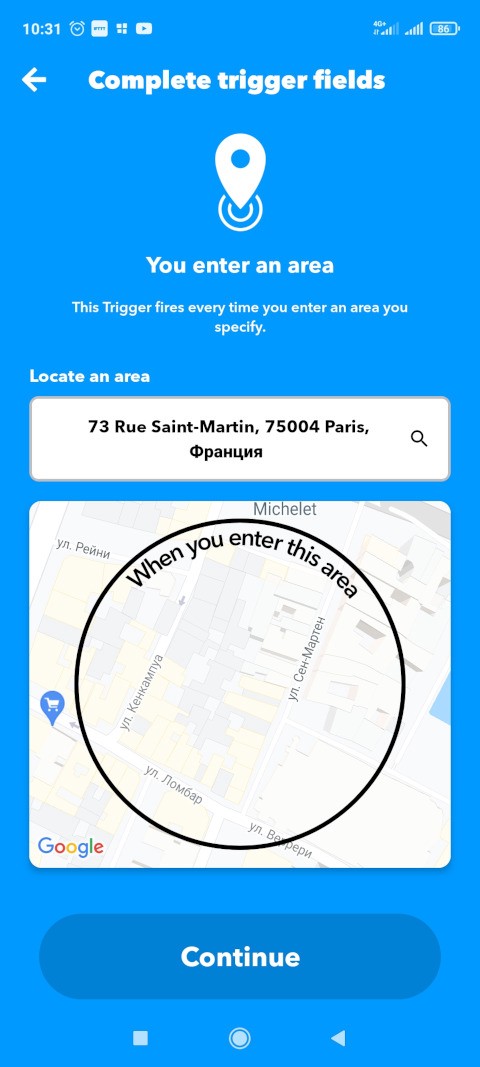
Right now, we use IFTTT to turn on the lamp when a certain smartphone approaches the house, and accordingly, turn off the lamp when it moves away from home.
First of all, you need to install the official application from the Play Market
In it, we create a new applet, where the condition will be Location → Enter an area
And the executed action Webhooks → Web request:
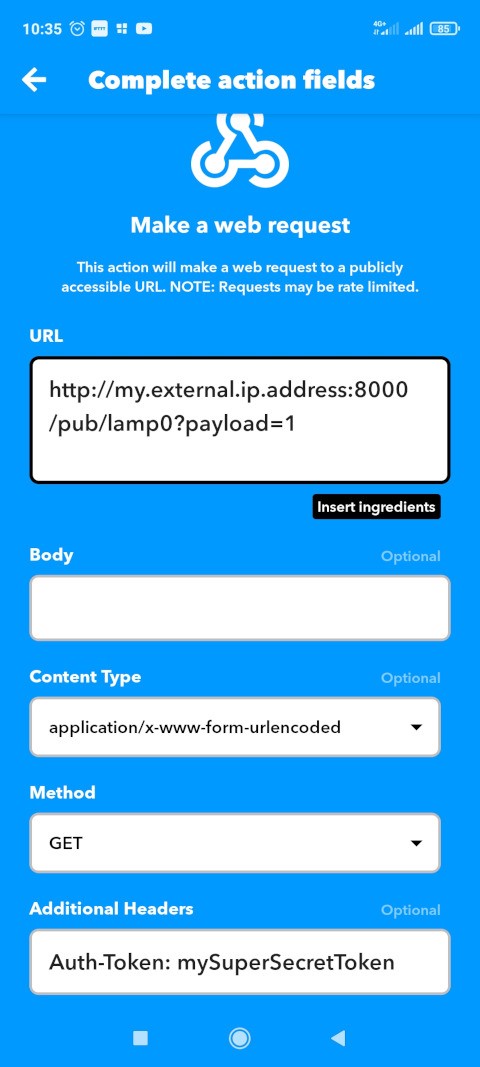
For a web request to work, the bridge must be accessible from the internet.
Also, do not forget to specify the token that we created earlier in the Additional Headers field.
Auth-Token: 9ce1e1d92ddbcfe1cae0324f4da33bdc5dbc5be7
Creating more than three custom applets requires a $3.40/month subscription.
Similarly, an applet is created for the zone exit event.
The Location trigger can be replaced with Google Assistant →Say a phrase with a number and control the lamps with simple voice commands.
Conclusion
The WEB-MQTT bridge will still be useful to us in the future - it can be used to connect any software or device capable of performing a web request to our system.
Links
License
January 1, 1