MQTT Remote
Over-engineered solution for unpausing VLC player

There are several ways to stop playing a YouTube video when you are already cozy under the covers: you can lift yourself off the couch and press the play/pause button; or you can raise the remote button press system using MQTT and Python.
MQTT is a simple protocol designed to work in heavy network conditions, which is well suited for Internet of Things devices. You can read more about it in the article on Habrahabr.
In general terms, the description of the system will be as follows:
- A client agent runs on the desktop, which, firstly, receives messages from the MQTT server related to managing the media player, and secondly, sends information about the volume level back to the server;
- Somewhere, for example, on a Raspberry Pi (or on DigitalOcean’s VPS), the Mosquitto MQTT server is running, to which clients will connect;
- On the smartphone, a dashboard is installed, with the help of which commands are sent to the agent on the desktop, and which displays information from him or other clients, such as temperature sensors.
The MQTT server will be useful to us in the future and will be the center of the entire network of Internet of Things devices, because it can be used not only to press buttons. I will write about this in subsequent posts.
Setting up Mosquitto
Using the package manager, install the server:
$ yay -Syu mosquitto
Your linux distro may have a different command.
Next you need to edit the config/etc/mosquitto/mosquitto.conf
pid_file /var/run/mosquitto.pid
persistence true
persistence_file mosquitto.db
persistence_location /opt/mosquitto/
log_dest none
log_timestamp_format %Y-%m-%dT%H:%M:%S
log_type debug
log_type error
log_type warning
log_type notice
log_type information
connection_messages true
log_timestamp true
allow_anonymous false
password_file /etc/mosquitto/passwd
listener 19780
protocol mqtt
Pay attention to the following parameter:
persistence_location /opt/mosquitto/
This is the directory where the server database will be stored. It must exist and be writable by user mosquitto.
$ sudo mkdir /opt/mosquitto
$ sudo chown mosquitto:root /opt/mosquitto
$ ll /opt/
 …
drwxr-xr-x 2 mosquitto root 4096 Nov 13 18:04 mosquitto
ll is an alias for ls -l
Second parameter:
listener 19780
This is the port on which the server will accept connections.
It can, and probably should be changed to something else. Especially if you then have to forward it on the router.
It won’t add much security, but at least something.
You may need to configure a firewall, according to your distribution’s documentation.
We will immediately create a username and password with which all clients will log in.
$ sudo mosquitto_passwd -c /etc/mosquitto/passwd mqttlogin
The option -c will overwrite the existing /etc/mosquitto/passwd. Be careful.
Now the server can be started.
$ sudo systemctl enable --now mosquitto.service
To check in one terminal, run:
$ mosquitto_sub -h 127.0.0.1 -p 19780 -t "test" -u "mqttlogin" -P "MQttPassWord123"
And in another:
$ mosquitto_pub -h 127.0.0.1 -p 19780 -t "test" -m "hello" -u "mqttlogin" -P "MQttPassWord123"
And if everything is fine, in the first terminal we will see the message hello.
Despite the use of a password, the connection itself will not be encrypted. This must be taken into account if you open access to the MQTT server from the Internet.
Client agent
First you need to install the dependencies. Either with a package manager or pip.
$ yay -Syu python-psutil python-pulsectl python-paho-mqtt
Somewhere, in a convenient place (I usually use for this ~/bin/) create a directory mqtt-desktop-agent, and in it a couple of files:
DEBUG = False

MQTTSRV = '192.168.0.10'
MQTTPORT = 19780
MQTTUSER = 'mqttlogin'
MQTTPASS = 'MQttPassWord123'

INTERVAL = 2

TOPIC_PREFIX = 'home/desktop/'

TOPICS = ('media/key',
          'media/volume')
#!/bin/env python3

import psutil
import time
import json
import sys
import os
import subprocess
import pulsectl
import paho.mqtt.client as mqtt
from config import *


def do_key(key, display=0):
    subprocess.run(['xdotool', 'key', key],
                   env=dict(os.environ, **{"DISPLAY": ":" + str(display)}))


def on_conn(client, userdata, flags, rc):
    for topic in TOPICS:
        client.subscribe(TOPIC_PREFIX + topic)
        if DEBUG:
            print('MQTT Subscribe: ' + topic)


def on_msg(client, userdata, msg):
    if DEBUG:
        print(msg.topic + ': ', msg.payload)
    if msg.topic == TOPIC_PREFIX + 'media/key':
        if msg.payload == b'play':
            if DEBUG:
                print('MEDIAKEY PLAY/PAUSE')
            do_key('XF86AudioPlay')
        elif msg.payload == b'next':
            if DEBUG:
                print('MEDIAKEY NEXT')
            do_key('XF86AudioNext')
        elif msg.payload == b'prev':
            if DEBUG:
                print('MEDIAKEY PREV')
            do_key('XF86AudioPrev')
        else:
            print('Unknown key')
    elif msg.topic == TOPIC_PREFIX + 'media/volume':
        sink = pulse.get_sink_by_name(pulse.server_info().default_sink_name)
        vol = round(int(msg.payload) / 100.0, 2)
        if DEBUG:
            print('SET VOLUME TO {}'.format(vol))
        pulse.volume_set_all_chans(sink, vol)
    else:
        print('Unknown topic')


def do_pub(topic, payload):
    if DEBUG:
        print('MQTT Publish: ' + topic + ' : ' + str(payload))
    mqtt_agent.publish(topic, payload, qos=0, retain=True)


nodename = psutil.os.uname().nodename
pulse = pulsectl.Pulse('mqtt-desktop-agent-' + nodename)
mqtt_agent = mqtt.Client()
mqtt_agent.on_connect = on_conn
mqtt_agent.on_message = on_msg
mqtt_agent.username_pw_set(MQTTUSER, MQTTPASS)
mqtt_agent.connect(MQTTSRV, MQTTPORT, 60)
mqtt_agent.loop_start()


while True:
    try:
        sink = pulse.get_sink_by_name(pulse.server_info().default_sink_name)
        payload = {
            nodename: {
                'loadavg': psutil.getloadavg(),
                'time': int(round(time.time() * 1000)),
                'cpupercent': psutil.cpu_percent(),
                'sensors': psutil.sensors_temperatures(),
                'volume': round(sink.volume.values[0], 2) * 100
            }
        }
        if mqtt_agent.is_connected():
            do_pub(TOPIC_PREFIX + 'stat', json.dumps(payload))
        time.sleep(INTERVAL)
    except KeyboardInterrupt:
        mqtt_agent.loop_stop()
        sys.exit()
In the file config.py, specify the server IP, and the login / password of the connection.
Then we create a file ~/.config/systemd/user/mqtt-desktop-agent.service:
[Unit]
Description=MQTT Desktop Agent

[Service]
ExecStartPre=/bin/sh -c 'until ping -c1 google.com; do sleep 1; done;'
ExecStart=python /home/yourusername/bin/mqtt-desktop-agent/mqtt-desktop-agent.py

[Install]
WantedBy=default.target
We edit the path of our home directory in it in accordance with the username.
I had to use a dirty hack with Google’s ping
ExecStartPrein order for the service to start after the network really started working.
We turn on and start the agent, and enable lingering, to automatically start:
$ systemctl --user enable --now mqtt-desktop-agent.service
$ sudo loginctl enable-linger yourusername
Dashboard
We install the Mqtt Dashboard application , add our server to the list of brokers, specifying its IP, port and credentials.
By the way, in terms of MQTT, the server is called a broker.

After that, lets add a couple of tiles.
One type “Standard-Button”:
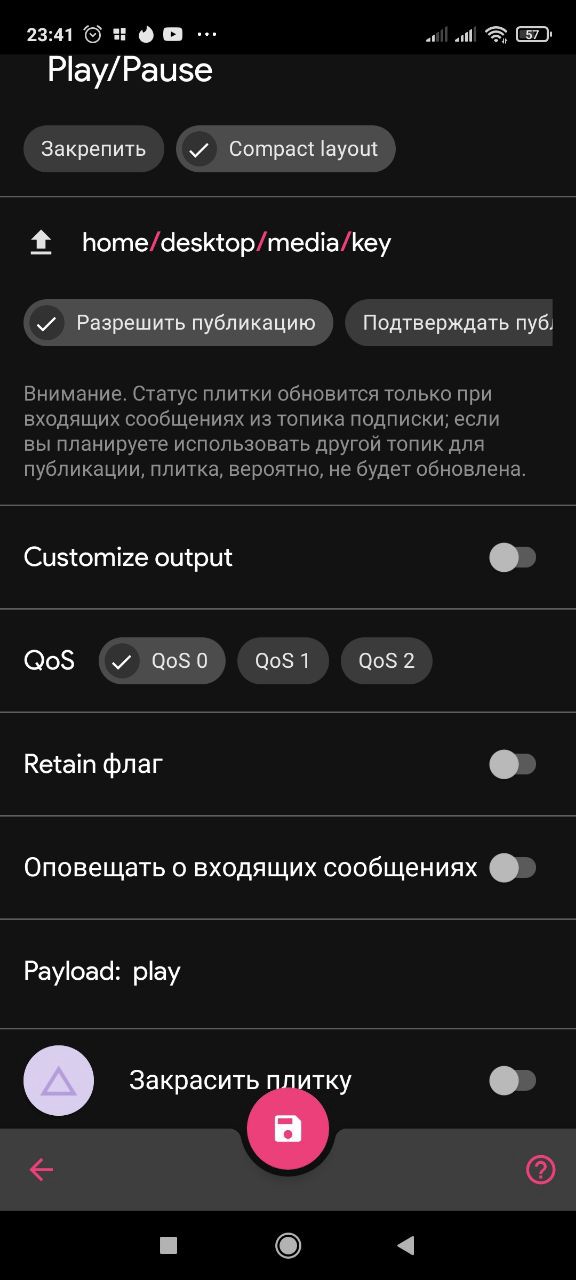
Here the parameters speak for themselves. Look at the config.py agent file and you will understand how the topic for publication is set.
In the same way, you can add two more buttons by specifying prevand respectively in payload next to switch tracks in the player forward and backward.
And one more tile like “Standard-Progress”:
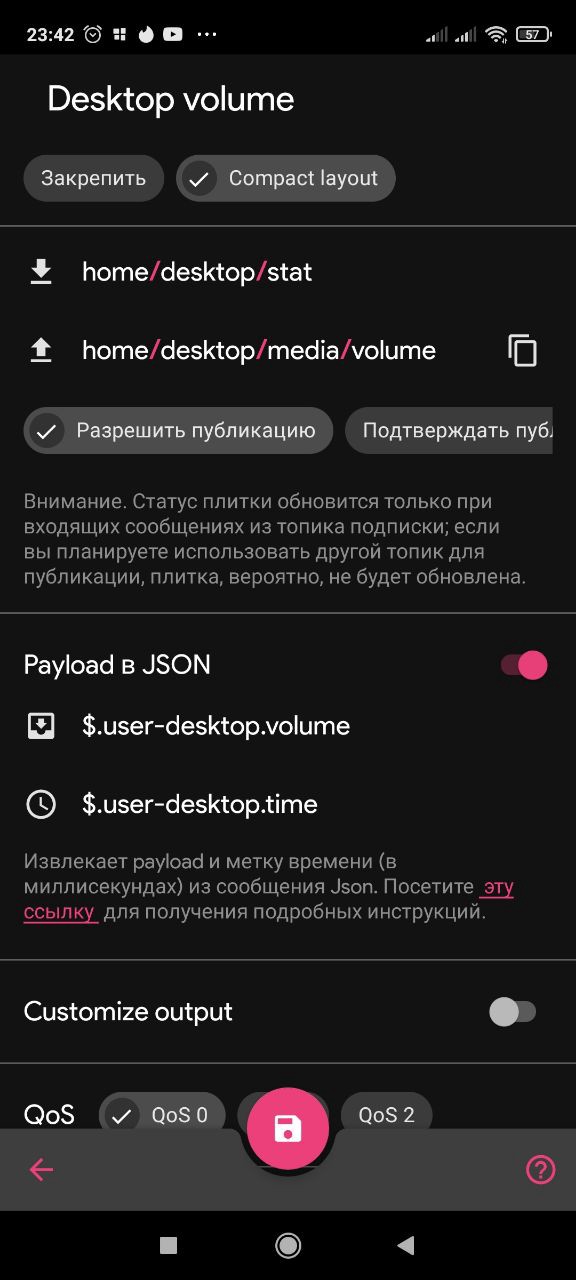
In this case, things are a little trickier. The agent publishes /home/desktop/stat information about the system in the form of JSON to the topic, and the button in the dashboard publishes the volume value to the topic /home/desktop/media/volume.
And in order to correctly display information about the current volume in the system (after all, it can change not only through the dashboard), you need to enable the “Payload in JSON” option and enter the correct json path, replacing user-desktop the path with the hostname of the system where the agent is running.
Conclusion
Now you know enough to add tiles to the dashboard with information about the system temperature or the average load without changing the agent code. And, of course, no more having to get up from the couch to stop playback or adjust the volume.
In the following articles, I will try to talk about controlling the lighting in the apartment using the same dashboard.
Links
License
m0nochr0me
April 29, 2022